How do I prepare artwork for print?
This guide explains how to export and supply print-ready artwork. It includes advice about the program to use, correct sizing, bleed, margins, and file types to ensure an error-free print with a professional finish.
1: Program and file type
We recommend using Adobe Illustrator or InDesign to finalise your artwork.
Export as PDF, or vector (.ai .eps) if it may need resizing.
If you're using Canva, check out our Canva guide here.
2: Colour (RGB vs. CMYK)
Remember that colours look different on screen compared with when printed. As well as this, different screens can show differences. When you prepare artwork for printing, always use CMYK.
3: Resolution
Resolution is measured in DPI (dots per inch). DPI is the number of dots, or pixels, that would fit into an inch if the image was printed unscaled. The higher the DPI number, the higher the resolution. In general, 300DPI is the minimum you’d need but with large format printing likely to be viewed from a distance, 150DPI should be fine.
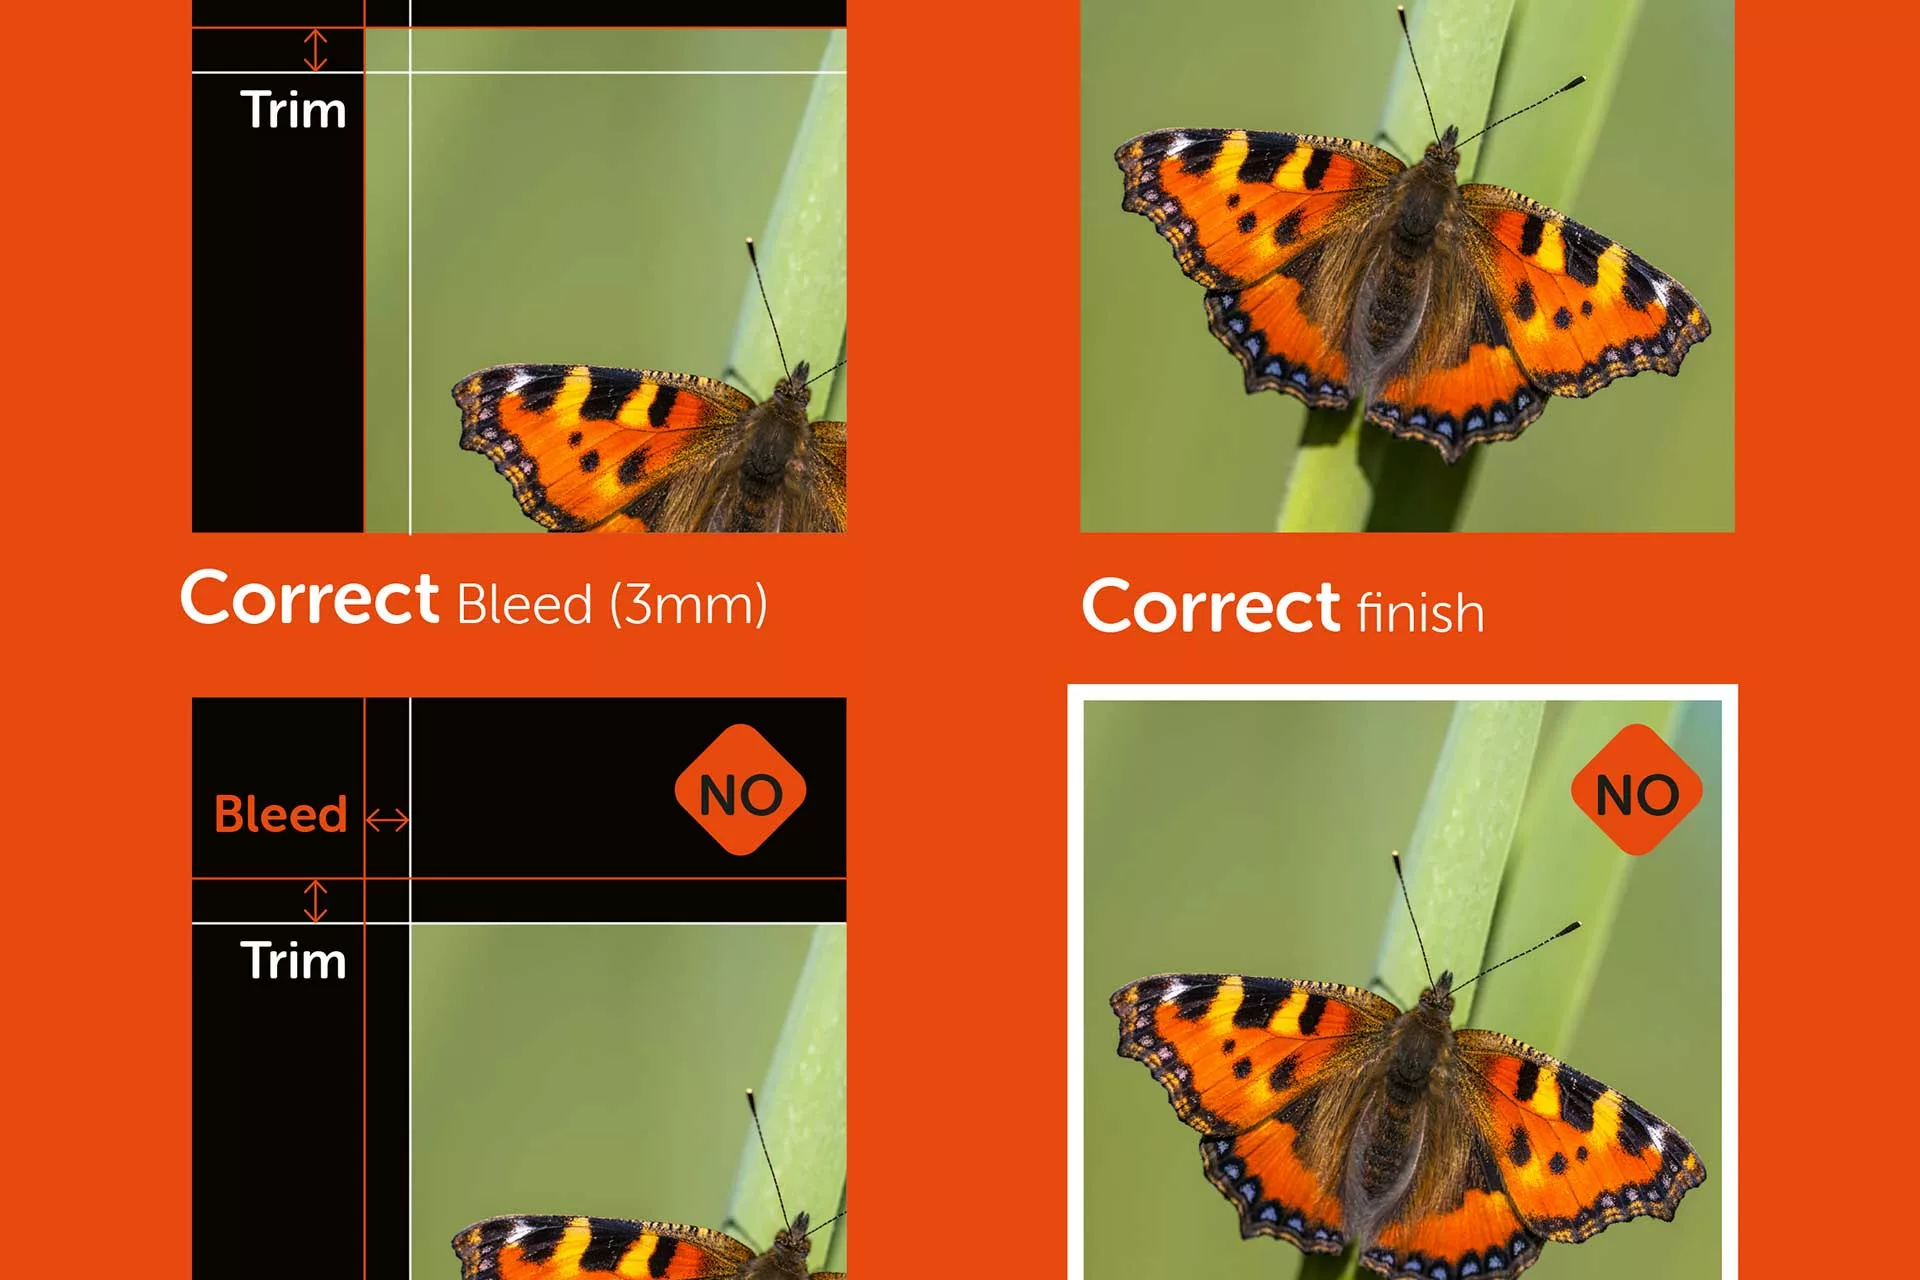
4: Bleed, Trim and Margins
Adding a bleed is essential for any method of printing and most printing requires a 2mm to 4mm bleed but some pieces, either particularly large or with folds may require much larger bleeds, you can discuss this with your printer.
In the printing process, the artwork is printed onto a larger paper stock than the finished piece, then cutting machines will trim the printed image to your specifications. If you haven’t left a bleed this cutting will leave a noticeable white line and look unprofessional.
The trim box will tell the printers where your artwork needs to be cut to. This will be smaller than the bleed area and the same size as the final print measurements. It’s wise to have all important visuals or information within a safe area, roughly 4mm smaller than the trim box on each side.
With less simple printing, such as packaging or banners, you may be more comfortable with a template for you to add your artwork into. Your printer can provide this.
Margin (or safe zone) is the inner buffer which keeps text and important elements away from the edges. It's best practice not to put text, images or logos in the print margins. Unless, of course, you have a background image, which should be extended out to the bleed line.

5: Embed all fonts or convert to vector paths.
This ensures any fonts you have used which may be on your machine but not your printers won’t revert to a default and ruin the look of our artwork.
6. Proofs
Printers will usually send back a digital proof for you to check, to ensure that your file hasn’t been changed by the systems we use.
If you are doing a very long print run, a very large piece of work or it’s just extremely important, print proofs can be supplied so you can see a sample of the work in the flesh. Going back to the RGB vs CMYK point earlier, you might notice the colours don’t look right when printed if you have supplied an image in RGB.
For more advice on preparing artwork for print, you can contact an expert printer like Inspired Print Solutions.
Got a Question?
Frequently Asked Questions


To prepare artwork for print, you should create your design at the correct finished size, use CMYK colour mode, ensure images are high resolution (usually 300 DPI), add bleed, keep important content within safe margins, and export your file as a print-ready PDF or vector file. Following these steps helps avoid printing errors and ensures a professional finish.
Print-ready artwork is a file that has been set up correctly for professional printing. This includes the correct dimensions, bleed and trim marks, CMYK colour mode, sufficient image resolution, and embedded fonts. A print-ready file should not need editing by the printer before production.
Adobe Illustrator and Adobe InDesign are the preferred programs for preparing artwork for print, as they give full control over sizing, bleed, colour modes, and export settings. Photoshop can be used for image-based designs, but layout software is better for multi-page or text-heavy artwork. If you are using Canva, extra care is needed when exporting for print.
Absolutely! Check out our Canva artwork guide here.
Always use CMYK when preparing artwork for print. Screens display colours in RGB, but printers use CMYK inks. If artwork is supplied in RGB, colours may shift during printing, leading to unexpected results. Converting to CMYK before export gives you better control over the final printed colours.
For most print jobs, images should be at least 300 DPI at final size. For large-format printing that will be viewed from a distance, 150 DPI is usually acceptable. Low-resolution images can appear blurry or pixelated when printed, even if they look fine on screen.
Bleed is the area of artwork that extends beyond the final trim size, usually by 2–4mm. It ensures there are no white edges when the printed piece is trimmed. Without bleed, slight movement during cutting can leave unprinted lines, making the job look unprofessional.
Bleed is the extra artwork beyond the edge that will be trimmed off.
Trim is the final finished size of the printed piece.
Margins (safe zones) are the inner areas where important text and logos should stay clear of the edge, typically around 4mm inside the trim. Keeping content within margins ensures nothing important is cut off.
Yes. Fonts should be embedded or converted to outlines (vector paths) before supplying artwork for print. This prevents fonts from defaulting or changing if the printer does not have the same fonts installed, protecting the integrity of your design.
A print-ready PDF is usually the best format, as it preserves fonts, images, colours and layout. Vector files such as AI or EPS are also suitable, especially if artwork may need resizing. Avoid supplying Word, PowerPoint or low-quality image files unless advised by your printer.
A print proof is a preview of how your artwork will print. Most printers provide a digital proof to check layout, text and positioning. For high-value, long-run or colour-critical jobs, a physical print proof is recommended so you can see the colours and materials before full production.
If artwork is not print-ready, it may cause delays, extra costs, or printing errors such as colour shifts, white borders, missing fonts or low-quality images. Some printers can fix issues, but it’s always best to prepare artwork correctly from the start or ask for guidance before submitting files.
A professional printer can advise on file setup, bleed requirements, templates and export settings. If you’re unsure at any stage, it’s best to ask before printing begins. This helps avoid costly mistakes and ensures the final product looks exactly as intended.
Get in touch with our print experts if you have any queries.