How do I export print-ready artwork from Canva?
This guide explains how to set up, export and supply print-ready artwork using Canva. It includes advice about correct sizing, bleed, margins, and PDF export settings to ensure an error-free print with a professional finish.
Step 1: Artboard
Click Create a design then either choose one of the print presets, or type in a custom size, such as 420mm x 594mm (A2). Standard print sizes can be found in our paper and envelope sizes page.
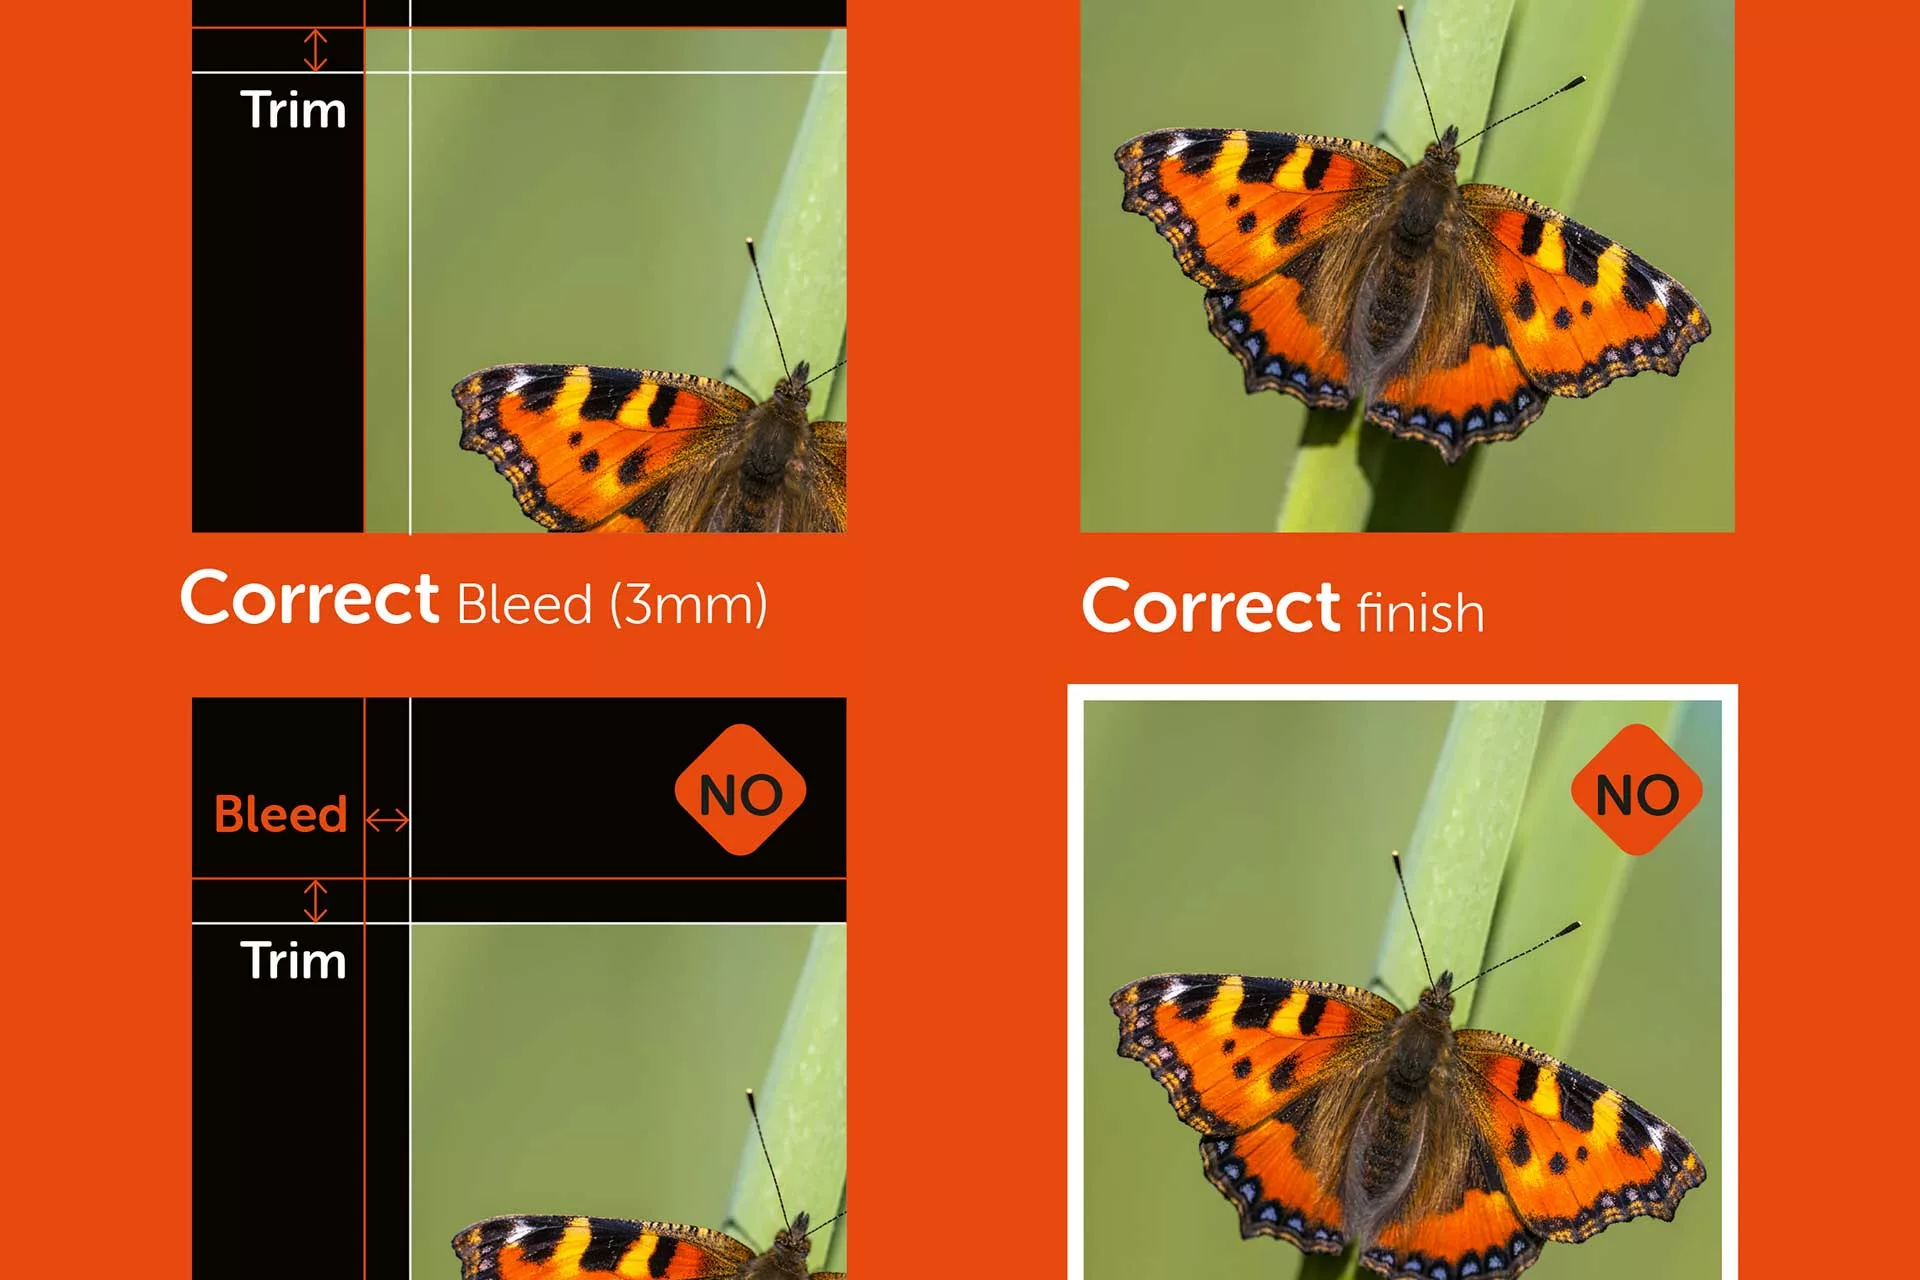
Step 2: Margin and bleed
Click File -> Settings and tick Show print bleed and Show margins

The bleed will appear as a line around the outside of the design. Extending your background to fill this space ensures there will be no white border on your final print
The margin is an inner buffer, or safe zone. It is best practice to keep any important parts of the design within this area.
To learn more about why you need bleed and margins, check out our detailed artwork advice page.
Step 3: Finish and Export
Once you are happy with your design, it needs to be exported in a print-ready format. To do this, click Share then Download.
On the download menu, select PDF Print, and tick the Crop marks and bleed and Flatten pdf options.
Ideally the colour profile should be CMYK for the most accurate colour results, this is a Canva Pro option, however. Your printer will convert it from RGB to CMYK if you don't have this as an option, colours might be affected.
Then, hit Download to generate a print-ready pdf.

Pro tip: be sure to proofread your file before sending the artwork to the printer!
Using the above guidance will ensure your print is error-free and has a professional finish.
If you’d prefer we did the design for you, get in touch with our team today to discuss your brief.
Got a Question?
Frequently Asked Questions


To show and include bleed in your design:
Open your Canva project.
Go to File → View settings → Show print bleed.
Extend background elements beyond the bleed line so they will print right to the edge.
Bleed helps prevent white borders after trimming.
For most professional printing, you should export your work as a PDF Print:
Click Share → Download.
Choose PDF Print as the file type.
Tick Crop marks and bleed.
This format includes trim/crop marks and (when ticked) the bleed area, helping printers trim the design correctly.
Canva designs default to RGB (screen-friendly). For better colour accuracy in printing:
Choose PDF Print → Colour Profile → CMYK if this option is available in your version of Canva (usually Canva Pro).
If you don’t have this option, your PDF will remain in RGB and we will convert it to CMYK, which can sometimes shift colour slightly.
Flattening isn’t strictly required, but can help avoid printing issues with complex layers or transparency:
Tick Flatten PDF when exporting only if you see transparency or font issues on export.
If the option isn’t available, Canva typically handles flattening automatically for print PDFs.
Before exporting, make sure your artboard is the exact final trim size (e.g., A4, A3, custom mm sizes). Standard dimensions should match your print job and not be scaled later by the printer.
If your job needs bleed, extend your design beyond the trim (via bleed settings) but keep the core dimensions accurate.
The safe zone (or margin) is the area inside the trim where important content like text, logos and QR codes should sit. Keeping them inside this zone prevents them from being accidentally cut off when the piece is trimmed after printing.
A good rule of thumb is 3–5 mm inside the trim edge.
Some common issues seen in Canva print submissions include:
Not adding bleed or crop marks (leading to white edges).
Using low-resolution images that print pixelated.
Relying on bright RGB colours that shift when converted to CMYK.
Making sure your file meets basic print specs helps avoid delays or extra pre-press work.